
Quick Answer
The 15 beginner yoga poses covered here are:
Key Takeaways
- Yoga poses, or asanas, are physical postures that help build strength, improve flexibility and reduce stress. The 15 poses in this guide are grouped below by body position, with a one-line summary of each. Full step-by-step instructions, modifications and safety notes follow further down.
- Yoga is widely practised. In a United States national survey, the percentage of adults reporting yoga use increased from 5.0 percent in 2002 to 15.8 percent in 2022.[1]
- Beginner yoga poses are foundational positions that can be learned in a stable and adaptable form. They introduce basic skills such as:
Beginners often make yoga harder than it needs to be. The most common problem is not a lack of flexibility. It is trying to copy the shape of another person’s pose instead of working within a steady, comfortable range.
The 15 beginner yoga poses in this guide introduce standing, kneeling, balancing, prone, seated and reclining positions. Each section explains how to enter the pose, what to adjust, how long to stay and when to choose an easier variation. A 20-minute practice sequence is included after the step-by-step instructions.
The aim is not to reach the deepest possible shape. It is to move with control, breathe without strain and leave each pose safely. A basic pose can still require modification, especially during pregnancy or when a person has pain, balance problems, glaucoma, severe high blood pressure, a recent injury or surgery, or a spinal or joint condition.
- Mountain Pose – Tadasana
- Standing Forward Fold – Uttanasana
- Downward-Facing Dog – Adho Mukha Svanasana
- Cat-Cow – Marjaryasana-Bitilasana
- Child’s Pose – Balasana
- Tree Pose – Vrikshasana
- Warrior I – Virabhadrasana I
- Warrior II – Virabhadrasana II
- Triangle Pose – Trikonasana
- Plank Pose – Phalakasana
- Cobra Pose – Bhujangasana
- Bridge Pose – Setu Bandha Sarvangasana
- Bound Angle Pose – Baddha Konasana, often called Butterfly Pose
- Reclined Twist – commonly called Supta Matsyendrasana
- Corpse Pose – Savasana
A practical starting point is 10 to 20 minutes, two to four times a week. Stay for about three to five relaxed breaths in most poses, or use the shorter times given below. Stop before the breath becomes strained or the position becomes painful.
Yoga Poses by Category
Yoga poses, or asanas, are physical postures that help build strength, improve flexibility and reduce stress. The 15 poses in this guide are grouped below by body position, with a one-line summary of each. Full step-by-step instructions, modifications and safety notes follow further down.
1. Standing Poses
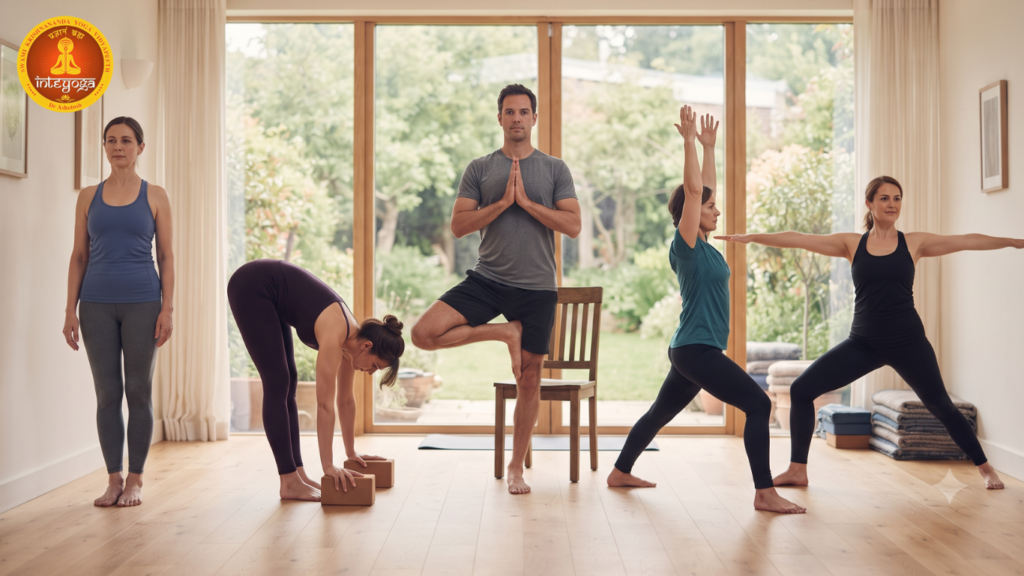
- Mountain Pose (Tadasana): Stand with the feet hip-width apart and the arms beside the body to improve posture and even weight distribution.
- Standing Forward Fold (Uttanasana): Hinge forward from the hips with softened knees to release the back of the legs.
- Warrior I (Virabhadrasana I): Step one foot back and bend the front knee to build lower body strength.
- Warrior II (Virabhadrasana II): Turn the stance sideways and bend the front knee to build leg endurance and open the hips.
- Triangle Pose (Trikonasana): Hinge sideways with straight legs and rest the lower hand on a block to stretch the side body.
2. Floor and Seated Poses
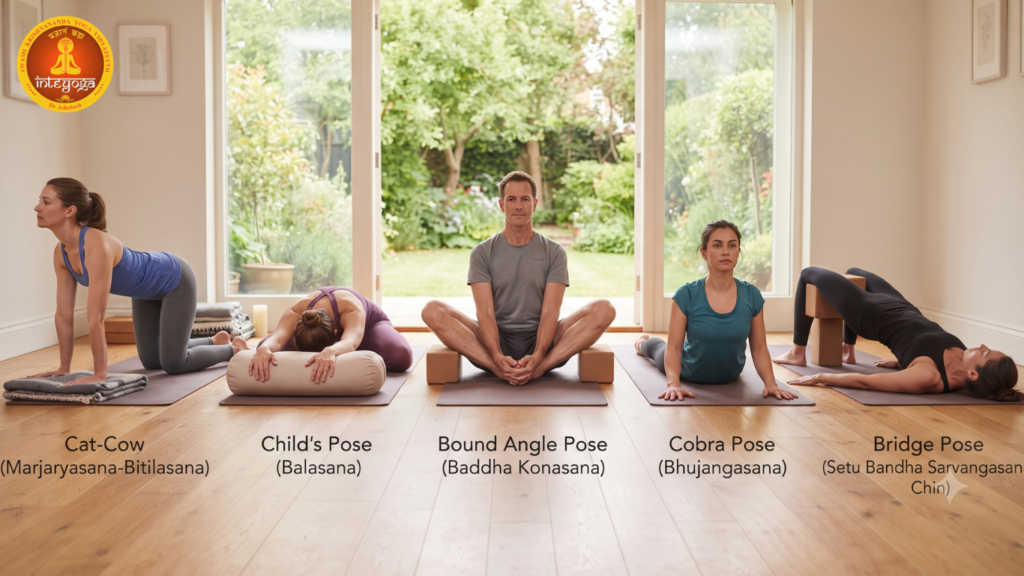
- Cat-Cow (Marjaryasana-Bitilasana): Move smoothly between gentle arching and rounding on your hands and knees to warm up the spine.
- Child’s Pose (Balasana, also called Shishuasana): Kneel, sit back toward the heels and rest the forehead forward to release the back and calm the mind.
- Downward-Facing Dog (Adho Mukha Svanasana): Press into the hands and feet to lift the hips into an inverted V-shape, stretching the back body.
- Cobra Pose (Bhujangasana): Lift the chest a small distance using the back muscles to strengthen the upper back.
- Bound Angle Pose (Baddha Konasana): Bring the soles of the feet together with the knees supported to open the hips and inner thighs.
- Bridge Pose (Setu Bandha Sarvangasana): Press through the feet and lift the pelvis to strengthen the glutes, legs and back.
- Reclined Twist (Supta Matsyendrasana): Let the bent knees drop slowly to one side to rotate the spine gently.
- Corpse Pose (Savasana): Lie supported and still at the end of practice to rest and settle the breath.
3. Core and Balancing Poses
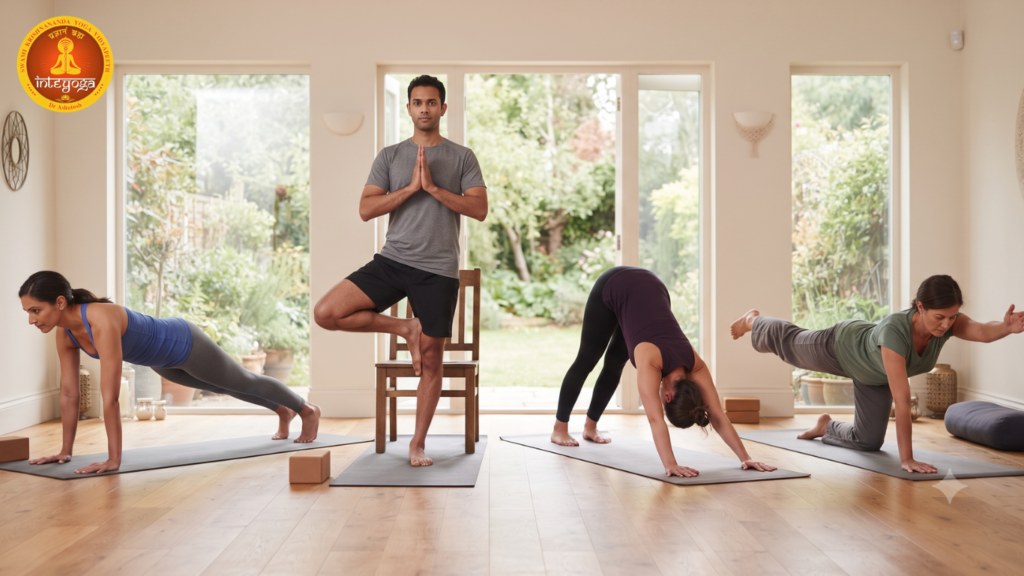
- Plank Pose (Phalakasana): Hold your body in a straight line from head to heels to build core and arm strength.
- Tree Pose (Vrikshasana): Place one foot on the inner calf or inner thigh to practise focus and balance.
Every pose above can be made easier with a wall, chair, block or blanket. Choose the variation that lets you breathe comfortably rather than the deepest shape.
Does Beginner Yoga Work? What the Research Supports
Yoga is widely practised. In a United States national survey, the percentage of adults reporting yoga use increased from 5.0 percent in 2002 to 15.8 percent in 2022.[1]
Research does not support every health claim made about yoga. The strongest evidence is condition-specific. The National Center for Complementary and Integrative Health, or NCCIH, reports that yoga may provide a small benefit for low-back pain and may help with some aspects of stress, balance and general well-being. Evidence for many other conditions is limited or inconsistent.[2]
A 2024 randomized clinical trial assigned 140 adults with chronic low-back pain to a 12-week live virtual therapeutic yoga program or a wait-list control.
The yoga group had greater improvements in pain intensity and back-related function, and the researchers reported no serious adverse events. The study evaluated a structured therapeutic program for a specific condition, not an unsupervised general routine.[3]
An earlier randomized trial involving 320 adults with nonspecific chronic low-back pain found that a standardized yoga program was noninferior to physical therapy for pain and function at 12 weeks. Most reported adverse events were mild and self-limited. Again, this finding applies to a manualized program designed for chronic low-back pain, not to every yoga class or every type of back pain.[4]
Yoga is generally considered safe for healthy people when practised appropriately, but strains and other injuries can occur. Beginners should avoid extreme postures and forceful breathing, use modifications, and seek qualified guidance when a health condition changes what is safe.[2]
What are Beginner Yoga Poses?
Beginner yoga poses are foundational positions that can be learned in a stable and adaptable form. They introduce basic skills such as:
- distributing weight through the feet and hands
- keeping the knees aligned with the direction of the toes
- moving the spine without forcing its range
- supporting balance with a wall or chair
- noticing when the breath becomes strained
- entering and leaving a pose with control
Patanjali’s Yoga Sutra 2.46 states sthira sukham asanam, commonly translated as “the posture should be steady and comfortable.”[5] That principle does not mean every pose must feel effortless. It means effort should remain controlled and should not become pain, panic or loss of breath.
A beginner variation is appropriate when you can:
- breathe comfortably
- keep the main joints supported
- leave the pose without collapsing or rushing
- avoid sharp, increasing, radiating or electrical pain
- remain aware of dizziness, numbness, tingling or unusual shortness of breath
Beginner Yoga Poses Chart

The durations below are suggested starting points, not requirements.
| # | Pose | Sanskrit name | Position | Suggested starting duration | Main practice focus |
|---|---|---|---|---|---|
| 1 | Mountain Pose | Tadasana | Standing | 3-5 breaths | Postural awareness and weight distribution |
| 2 | Standing Forward Fold | Uttanasana | Standing fold | 3-5 breaths | Hip hinging and the back of the legs |
| 3 | Downward-Facing Dog | Adho Mukha Svanasana | Weight-bearing | 3-5 breaths | Shoulder support, spinal length and legs |
| 4 | Cat-Cow | Marjaryasana-Bitilasana | Hands and knees | 6-8 slow cycles | Gentle spinal movement |
| 5 | Child’s Pose | Balasana | Kneeling | 30-60 seconds | Supported rest and back-body breathing |
| 6 | Tree Pose | Vrikshasana | Standing balance | 3-5 breaths each side | Balance and concentration |
| 7 | Warrior I | Virabhadrasana I | Standing | 3-5 breaths each side | Legs, stance and chest opening |
| 8 | Warrior II | Virabhadrasana II | Standing | 3-5 breaths each side | Leg endurance and hip position |
| 9 | Triangle Pose | Trikonasana | Standing | 3-5 breaths each side | Lateral length and leg stability |
| 10 | Plank Pose | Phalakasana | Weight-bearing | 10-20 seconds | Trunk and shoulder stability |
| 11 | Cobra Pose | Bhujangasana | Prone | 3-5 breaths | Gentle spinal extension and upper-back work |
| 12 | Bridge Pose | Setu Bandha Sarvangasana | Supine | 3-5 breaths | Posterior-chain strength and chest opening |
| 13 | Bound Angle Pose | Baddha Konasana | Seated | 30-60 seconds | Hip and inner-thigh mobility |
| 14 | Reclined Twist | Supta Matsyendrasana | Supine | 3-5 breaths each side | Gentle spinal rotation |
| 15 | Corpse Pose | Savasana | Supine rest | 3-10 minutes | Rest and body awareness |
The 15 Beginner Yoga Poses, Step by Step
1. Mountain Pose – Tadasana
Mountain Pose is the reference position for many standing asanas. It teaches how to stand without forcing the chest forward or locking the knees.
- Stand with the feet hip-width apart. Keeping the feet together is optional, not required.
- Point the toes generally forward and spread the weight across the heel, the base of the big toe and the base of the little toe.
- Keep the knees straight but not pushed backward.
- Bring the pelvis into a comfortable neutral position. Avoid tucking or arching aggressively.
- Stack the lower ribs over the pelvis instead of lifting the chest sharply.
- Let the shoulders relax and lengthen through the crown of the head.
- Keep the arms beside the body and breathe normally.
Suggested duration: 3 to 5 breaths.
Common adjustment: A beginner may try to create “good posture” by pushing the ribs and chin forward. Think of becoming taller without becoming rigid.
Easier variation: Stand with the back lightly touching a wall, leaving the natural curves of the spine in place.
Safety note: Practise near a wall or chair if you feel unsteady. Sit down if standing still causes dizziness.
2. Standing Forward Fold – Uttanasana
A forward fold should begin at the hips, with the knees bent enough to keep the movement comfortable.
- Begin in Mountain Pose and place the hands on the hips.
- Soften the knees.
- Hinge forward from the hip creases while keeping the front of the torso long.
- Place the hands on blocks, a chair, the shins or the floor, depending on your range.
- Let the head relax only if being head-down is comfortable.
- Keep the knees bent if straightening them rounds or strains the lower back.
- To rise, bend the knees, place the hands on the hips and return through a controlled hip hinge.
Suggested duration: 3 to 5 breaths.
Common adjustment: Reaching the floor is not the objective. Support the hands high enough to avoid pulling aggressively through the back or hamstrings.
Easier variation: Place the hands on a chair and remain in a half fold with the torso closer to parallel with the floor.
Safety note: People with glaucoma, vertigo, severe uncontrolled blood pressure, or a spinal condition may need to avoid or modify head-below-heart positions. Seek individual advice rather than relying on a general instruction.
3. Downward-Facing Dog – Adho Mukha Svanasana
Downward-Facing Dog lifts the hips into an inverted V-shape, combining weight-bearing through the arms with length through the spine and legs. Bent knees are often the most useful beginner variation.
- Begin on hands and knees, with the hands slightly ahead of the shoulders and the knees under the hips.
- Spread the fingers and press evenly through the palms.
- Tuck the toes and lift the hips upward and backward.
- Keep the knees bent and lengthen the spine first.
- Move the chest gently toward the thighs without collapsing into the shoulders.
- Straighten the legs only as far as the spine remains comfortable.
- Let the heels move toward the floor without forcing them to touch.
Suggested duration: 3 to 5 breaths.
Common adjustment: The heels do not need to reach the floor. A shorter stance and bent knees can reduce strain in the shoulders, back and hamstrings.
Easier variation: Place the hands on a wall or sturdy counter and walk the feet back into an L-shaped position.
Safety note: Use an incline variation or seek guidance if the wrists or shoulders are painful. Stop if the pose causes numbness, tingling or increasing pain.
4. Cat-Cow – Marjaryasana-Bitilasana
Cat-Cow links gentle spinal flexion and extension with breathing, and is commonly used to warm up the spine at the start of practice.
- Begin on hands and knees, with the wrists under or slightly ahead of the shoulders and the knees under the hips.
- On an inhale, allow the chest and tailbone to lift slightly while the abdomen moves toward the floor.
- On an exhale, press the floor away and round the spine within a comfortable range.
- Let the head follow the spine rather than throwing it backward or dropping it forcefully.
- Move slowly enough to feel the change through several parts of the spine.
Suggested duration: 6 to 8 slow cycles.
Common adjustment: Do not chase the largest possible arch. Use a smaller movement if the lower back or neck feels compressed.
Easier variation: Place a folded blanket under the knees. Cat-Cow can also be practised while seated in a chair.
5. Child’s Pose – Balasana
Child’s Pose, called Balasana and also written as Shishuasana, is a kneeling rest position that can be supported in several ways.
- Kneel with the big toes together or slightly apart.
- Separate the knees to a comfortable width.
- Move the hips toward the heels without forcing them to touch.
- Fold forward and support the forehead on the mat, a block, folded hands or a cushion.
- Extend the arms forward or rest them beside the body.
- Breathe into the back and sides of the ribs.
Suggested duration: 30 to 60 seconds.
Common adjustment: If the hips remain far from the heels, place a folded blanket between the thighs and calves. If the torso feels compressed, widen the knees and use a bolster or cushions.
Alternative: Rest on the back with the knees bent if kneeling is uncomfortable.
Safety note: A recent knee injury may make this pose unsuitable. During pregnancy, use a wide-knee, fully supported prenatal variation and guidance appropriate to the stage of pregnancy.
6. Tree Pose – Vrikshasana
Tree Pose develops balance by narrowing the base of support. A wall is a useful training tool, not a sign of failure.
- Stand in Mountain Pose near a wall or sturdy chair.
- Shift the weight into the left foot.
- Place the right toes on the floor with the heel resting against the left ankle, or place the foot on the inner calf or inner thigh.
- Do not press the foot directly into the side of the knee joint.
- Keep the pelvis facing forward and the standing knee soft rather than locked.
- Bring the hands to the hips or palms together at the chest.
- Look at one steady point.
Suggested duration: 3 to 5 breaths each side.
Common adjustment: Begin with the toes on the floor. Balance improves through repeated small corrections, not through forcing the lifted foot higher.
Safety note: Use support if there is any risk of falling. Stop if you feel dizzy.
7. Warrior I – Virabhadrasana I
Warrior I introduces a split stance, a bent front knee and a lifted torso.
- Begin standing and step the left foot back to a comfortable distance.
- Turn the back foot outward and keep the heel grounded, or keep the heel lifted in a high-lunge variation if that is more comfortable.
- Widen the feet from side to side rather than standing on one narrow line.
- Bend the front knee in the direction of the second and third toes.
- Keep the front knee above or behind the ankle rather than pushing far beyond it.
- Turn the pelvis forward only as far as the stance allows without twisting the knee.
- Place the hands on the hips or raise the arms without lifting the lower ribs.
Suggested duration: 3 to 5 breaths each side.
Common adjustment: A stance that is too narrow can make balance difficult. Widen the feet and shorten the distance between them.
Easier variation: Keep the hands on the hips and use a shorter stance.
8. Warrior II – Virabhadrasana II
Warrior II opens the stance sideways and develops leg endurance.
- Stand with the feet wide but not so wide that the inner thighs strain.
- Turn the right foot outward and the left foot slightly inward.
- Bend the right knee in the same direction as the right toes.
- Keep the torso upright over the pelvis rather than leaning over the front leg.
- Extend the arms at shoulder height, or place the hands on the hips if the shoulders tire.
- Look over the front hand or keep the head neutral.
Suggested duration: 3 to 5 breaths each side.
Common adjustment: Check that the front knee does not collapse inward. Reduce the depth of the bend if alignment or breathing becomes difficult.
Easier variation: Use a shorter, narrower stance and a smaller bend in the front knee.
9. Triangle Pose – Trikonasana
Triangle Pose combines straight legs, a sideward hip hinge and gentle rotation of the torso.
- Begin with a wide stance similar to Warrior II.
- Turn the right foot outward and the left foot slightly inward.
- Keep the right knee straight without locking it backward.
- Reach the right hand forward to lengthen the right side of the torso.
- Place the right hand on a block, the shin or the ankle. Avoid pressing directly on the knee joint.
- Place the left hand on the hip or extend it upward.
- Rotate the chest only as far as the neck, back and balance remain comfortable.
- Look down, forward or upward according to comfort.
Suggested duration: 3 to 5 breaths each side.
Common adjustment: Raise the lower hand onto a block or chair. A higher hand position usually supports better spinal length than reaching for the floor.
Safety note: People with osteoporosis, balance problems or spinal conditions may require a wall-supported version and individualized guidance.
10. Plank Pose – Phalakasana
Plank develops core and arm strength along with shoulder stability. A knees-down or inclined plank is still a complete beginner variation
- Begin on hands and knees.
- Place the hands under or slightly ahead of the shoulders.
- Step one foot and then the other foot back.
- Keep a straight line from the head through the pelvis to the heels without letting the hips sag.
- Press the floor away and keep the neck in line with the spine.
- Draw the lower abdomen gently inward without holding the breath.
Suggested duration: 10 to 20 seconds.
Easier variation: Keep both knees on the floor, or practise with the hands on a wall or sturdy counter.
Common adjustment: End the hold when the hips sag, the shoulders collapse or the breath becomes strained. A shorter controlled hold is more useful than a longer unstable one.
Safety note: Use an incline or seek guidance if the wrists or shoulders are painful.
11. Cobra Pose – Bhujangasana
Cobra is a prone backbend that should begin as a low, controlled lift.
- Lie on the abdomen with the legs comfortably together or hip-width apart.
- Place the hands beside the lower ribs or under the shoulders.
- Keep the elbows close to the body and pointing backward.
- Press the tops of the feet and the front of the pelvis gently into the floor.
- Inhale and lift the chest a small distance using the back muscles, with only light pressure through the hands.
- Keep the neck long and look slightly forward rather than sharply upward.
- Lower with control.
Suggested duration: 3 to 5 breaths, or repeat 2 to 3 shorter lifts.
Common adjustment: A low Cobra is usually more appropriate for a beginner than pushing the arms straight. The height of the chest is less important than even movement through the spine.
Safety note: Do not practise prone backbends during pregnancy. Seek medical guidance after recent abdominal or spinal surgery or when back pain is acute, severe or radiating.
12. Bridge Pose – Setu Bandha Sarvangasana
Bridge Pose is a supine backbend that also trains the gluteal and leg muscles.
- Lie on the back with the knees bent and the feet flat, approximately hip-width apart.
- Place the feet close enough that the lower legs are roughly vertical when the hips lift.
- Keep the knees pointing forward rather than allowing them to fall outward.
- Press through the feet and lift the pelvis gradually.
- Keep the chest moving toward the chin without pressing the chin into the chest.
- Keep the head centred and do not turn it while the pelvis is lifted.
- Lower slowly.
Suggested duration: 3 to 5 breaths.
Easier variation: Lift only a small distance. A looped strap around the thighs or a block lightly held between the thighs can help the knees remain parallel, but it should not create strain.
Safety note: People with neck conditions should seek guidance. During pregnancy, avoid prolonged flat-on-the-back practice and use an appropriate prenatal alternative.[6]
13. Bound Angle Pose – Baddha Konasana
Baddha Konasana is often called Butterfly Pose. The static version is a supported seated hip position; it does not require bouncing the knees.
- Sit on the front edge of a folded blanket if the pelvis rolls backward.
- Bring the soles of the feet together and let the knees move outward.
- Move the feet farther from the pelvis if the hips or knees feel compressed.
- Support each knee with a cushion or block if needed.
- Hold the ankles or shins and lengthen the spine.
- Stay upright, or hinge forward slightly from the hips while keeping the movement comfortable.
Suggested duration: 30 to 60 seconds.
Common adjustment: Do not press or bounce the knees toward the floor. The distance between the knees and floor depends partly on individual hip anatomy.
Safety note: Stop if the pose creates knee or groin pain. Increase the support or choose a different seated position.
14. Reclined Twist – Supta Matsyendrasana
This common modern reclined twist uses gravity and support rather than force.
- Lie on the back with the knees bent and feet on the floor.
- Move the arms outward to a comfortable position.
- Bring the knees together and let them move slowly to the right.
- Place a cushion or folded blanket under the knees if they do not rest comfortably.
- Keep both shoulders comfortable rather than forcing them flat.
- Keep the head neutral or turn it gently away from the knees if the neck remains comfortable.
- Return to the centre and repeat on the other side.
Suggested duration: 3 to 5 breaths each side.
Common adjustment: Reduce the twist by placing more support under the knees. The objective is a comfortable rotation, not getting the knees to the floor.
Safety note: People with spinal conditions, recent surgery or pregnancy need an individualized variation.
15. Corpse Pose – Savasana
Savasana is a period of still, supported rest at the end of practice.
- Lie on the back with the legs extended, or keep the knees bent if that is more comfortable.
- Place a folded blanket or bolster under the knees if the lower back feels strained.
- Let the arms rest comfortably away from the torso, with the palms facing up or inward.
- Support the head lightly if needed, without pushing the chin sharply toward the chest.
- Close the eyes only if that feels safe and comfortable.
- Allow the breath to return to its natural rhythm.
- To finish, bend the knees, roll to one side and rise gradually.
Suggested duration: 3 to 10 minutes.
Alternative: Rest on one side or in a supported seated position if lying flat is uncomfortable. During pregnancy, use side-lying or another prenatal relaxation position rather than remaining flat on the back for a prolonged period.[6]
A 20-Minute Beginner Yoga Sequence
This sequence includes all 15 beginner poses. The times are approximate and total about 20 minutes.
| Order | Practice | Time | Main instruction |
|---|---|---|---|
| 1 | Sit or stand and breathe | 1 minute | Let the breath settle without forcing it |
| 2 | Cat-Cow | 1.5 minutes | 6-8 slow cycles |
| 3 | Child’s Pose | 30 seconds | Support the forehead |
| 4 | Downward-Facing Dog | 1 minute | Keep the knees bent |
| 5 | Standing Forward Fold | 30 seconds | Use blocks or a chair |
| 6 | Mountain Pose | 30 seconds | Re-establish steady standing |
| 7 | Warrior I | 2 minutes | About 1 minute each side, including transitions |
| 8 | Warrior II | 2 minutes | About 1 minute each side |
| 9 | Triangle Pose | 2 minutes | Use a block and practise both sides |
| 10 | Tree Pose | 2 minutes | Use a wall and practise both sides |
| 11 | Plank Pose | 30 seconds | Choose knees-down or incline plank if needed |
| 12 | Cobra Pose | 1 minute | Use 2-3 low repetitions or one short hold |
| 13 | Bridge Pose | 1 minute | Lift and lower with control |
| 14 | Bound Angle Pose | 1 minute | Support the knees |
| 15 | Reclined Twist | 1.5 minutes | Practise both sides |
| 16 | Savasana | 3 minutes | Rest in a comfortable position |
Transitions are included within the approximate times. Move more slowly or shorten the sequence when needed.
How Long Should a Beginner Hold Each Pose?
There is no universal hold time. A useful starting range is:
- Standing and stretching poses: 3 to 5 relaxed breaths
- Strength-based poses such as Plank: 10 to 20 seconds
- Gentle supported poses: 30 to 60 seconds
- Savasana: 3 to 10 minutes
Breath counting can help a beginner avoid staring at a clock, but it is not a test. End the pose when alignment deteriorates, the breath becomes strained, or symptoms such as pain, dizziness, numbness or tingling appear.
How Often Should a Beginner Practise?
A reasonable starting plan is two to four sessions a week, lasting 10 to 30 minutes. The best schedule is one that allows consistency and recovery.
One gradual approach is:
- Weeks 1-2: Learn 6 to 8 poses and practise for 10 to 15 minutes.
- Weeks 3-4: Use the full 20-minute sequence two or three times a week.
- Week 5 onward: Add time, repetitions or an extra weekly session before increasing the depth of a pose.
This is a practical framework, not a medical prescription. Age, activity level, health conditions and recovery all affect an appropriate frequency.
What is the Best Time of Day for Yoga?
There is no single best time for everyone.
Morning practice may feel mentally quiet but physically stiff. Evening practice may feel easier in the joints and muscles but should be adjusted if vigorous movement affects sleep. Choose a time when you are alert, unhurried and able to practise on a stable surface.
Avoid a demanding practice immediately after a large meal. Many people prefer to wait about two to three hours after a full meal, but individual comfort and medical needs vary. Do not delay food or medication in a way that conflicts with medical advice.
What Equipment Do You Need?
A beginner practice can be simple:
- a non-slip yoga mat on a stable floor
- one or two yoga blocks
- a folded blanket
- a sturdy chair or wall for balance
- cushions or a bolster for support
Thick books can substitute for blocks only if they are stable and cannot slide. Bare feet or non-slip socks are usually more secure than ordinary socks. Avoid practising on a mattress or another unstable surface.
Five Common Beginner Mistakes
1. Moving into Pain
A stretching sensation does not need to be intense to be useful. Stop for sharp, increasing, radiating or electrical pain, or for numbness, tingling, dizziness, chest pain or unusual shortness of breath.
2. Holding the Breath
Breath-holding often shows that the pose is too demanding. Reduce the range, use support or leave the pose.
3. Copying Another Person’s Range
Body proportions, joint structure, training history and injuries differ. A useful pose is one that fits the person practising it, not the photograph beside it.
4. Refusing Support
A wall, chair, block or blanket can improve stability and reduce unnecessary strain. Props change the conditions of a pose; they do not make the practice less valid.
5. Increasing too Many Things at Once
Do not increase frequency, hold time and pose depth in the same week. Change one variable and observe how the body responds.
Is Yoga Safe for Beginners?
NCCIH describes yoga as generally safe for healthy people when it is performed properly under the guidance of a qualified instructor. Sprains and strains can still occur, and older adults may require additional caution. Beginners are advised to avoid extreme practices such as headstands, shoulder stands, Lotus Pose and forceful breathing.[2]
Seek medical advice and qualified instruction before beginning or modifying yoga if you have a significant health condition, recent surgery or injury, severe high blood pressure, glaucoma, balance problems, lumbar spine disease, pregnancy, osteoporosis, or a recent joint replacement. This list is not exhaustive.
Stop practising and seek urgent medical care for symptoms such as chest pain, fainting, sudden weakness, severe shortness of breath, or a new neurological symptom. New severe back pain, pain following trauma, loss of bladder or bowel control, or pain with progressive weakness also requires medical assessment rather than a yoga routine.
During pregnancy, modified yoga may be appropriate for many people, but balance, joint laxity, heat tolerance and prolonged lying on the back require specific consideration. ACOG recommends discussing exercise with an obstetric care professional and using modified or prenatal yoga rather than assuming a general class is suitable.[6]
Poses Beginners Should Leave for Later
NCCIH specifically advises new practitioners to avoid extreme practices such as headstands, shoulder stands, Lotus Pose and forceful breathing.[2] Other poses that usually require more preparation include:
- deep backbends such as Wheel Pose
- unsupported arm balances
- advanced binds
- deep hip positions that create knee pressure
- breath retention or rapid forceful breathing without qualified instruction
These practices are not inherently wrong. They require suitable preparation, individual assessment and progressive teaching.
Beginner Yoga Poses for Specific Goals
For flexibility
Use Standing Forward Fold with bent knees, Downward-Facing Dog with bent knees, supported Bound Angle Pose, Triangle with a block, and a gentle Reclined Twist. Practise frequently enough to learn the positions, but avoid forcing range. Flexibility changes at different rates in different tissues and people.
For weight management
Yoga may support weight management, but it should not be presented as a guaranteed or rapid weight-loss method. NCCIH reports that research in people with overweight or obesity has found reductions in measures such as body weight or body mass index in some studies. Programs with better results tended to include longer and more frequent sessions, a longer overall duration, home practice and, in some cases, a dietary component.[7]
For general health and weight management, yoga can be combined with an appropriate walking, aerobic or strength program and nutrition guidance. People with a medical condition should use advice suited to that condition.
For back pain
Research supports some structured yoga programs for nonspecific chronic low-back pain, but it does not show that every pose is suitable for every back problem.[2][3][4]
A person with an established diagnosis may be taught adapted versions of Cat-Cow, Bridge, low Cobra, Child’s Pose or a supported twist. New, severe or radiating pain, weakness, numbness, fever, recent trauma, or changes in bladder or bowel function require medical assessment.[12] Do not use this article to diagnose or treat back pain.
For tight hips or hip discomfort
Supported Bound Angle Pose, a shorter Warrior II stance and Bridge may be useful for gentle mobility. Hip pain can arise from many structures and does not always improve with more stretching. Stop if a pose causes catching, sharp groin pain, knee pain or increasing symptoms.
For children
Children benefit from age-appropriate instruction, shorter sessions and an emphasis on play rather than long static holds. Cat-Cow, Tree, Cobra, Child’s Pose and Downward-Facing Dog are commonly adapted for children. A teacher working with children should understand child development, safeguarding and age-appropriate movement. Adult teacher-training eligibility should not be confused with children’s yoga instruction.
For partner practice
Partner yoga adds external force and can increase risk when one person pushes the other. Both people should first learn the individual pose independently. Simple options include back-to-back seated breathing or side-by-side Tree Pose with light hand contact. Never use body weight or leverage to force a partner deeper into a stretch.
For older adults
Chair-supported Mountain Pose, seated Cat-Cow, wall-supported Warrior II and Tree Pose with stable support can make practice more accessible. Older adults have a higher rate of yoga-related injuries treated in emergency departments than younger adults, according to NCCIH, so balance support, gradual progression and qualified instruction are particularly important.[2]
What Progress should a Beginner Track?
Fixed promises such as “touch your toes in six weeks” are not reliable. Progress varies with anatomy, age, health, previous activity and practice consistency.
More useful measures include:
- breathing remains steady for longer
- transitions become smoother
- less support is needed for balance
- the same pose requires less effort
- range improves without pain
- daily movements such as standing, reaching or getting down to the floor feel easier
Check progress monthly rather than after every session. The aim is better control and awareness, not a particular photograph.
Where to Go After the Basics
When these 15 poses feel steady, the next step may include:
- a beginner Sun Salutation taught slowly
- longer standing sequences
- introductory pranayama without forceful breathing or breath retention
- a regular seated meditation practice
- individualized modifications from a qualified teacher
Asana is one part of the broader system of yoga. Traditional study also includes ethical disciplines, breath practices, concentration and meditation
Frequently Asked Questions (FAQ)
Which yoga pose should a complete beginner learn first?
Mountain Pose is a useful first standing pose because it introduces foot placement, knee position, rib alignment and balance. Cat-Cow is a useful first floor movement because its range can be made very small.
Can I learn beginner yoga poses at home without a teacher?
Many healthy adults can begin with simple, well-supported variations at home. An instructor is valuable for checking alignment, selecting modifications and identifying when a pose is unsuitable. Seek professional guidance if you have pain, a health condition, pregnancy, recent surgery, balance problems or a history of injury.
How many beginner yoga poses should I learn?
Five to fifteen poses are enough to build a useful beginner practice. Learn a small number well before adding difficult variations.
How long does it take to become flexible?
There is no reliable universal timeline. Some people notice changes within weeks, while others require months. Joint structure, age, training history, frequency and the specific movement all matter. Do not use another person’s range as a deadline.
Should I do yoga on an empty stomach?
It is not necessary to be completely empty, but a full stomach can make folds, twists and prone poses uncomfortable. Many people wait about two to three hours after a large meal. Follow medical advice if you have diabetes, take medication with food or have another condition that affects meal timing.
What if I cannot touch my toes?
Bend the knees and support the hands on blocks, a chair or the shins. Toe-touching is not a requirement for yoga and is affected by body proportions as well as flexibility.
Is 15 minutes of yoga enough?
Fifteen minutes can be enough to practise consistently, learn technique and maintain a routine. The results depend on what is practised, how often it is repeated and the person’s goals. It should not be treated as a guaranteed dose for a medical outcome.
Which yoga style is suitable for beginners?
A slower beginner Hatha, foundational or gentle class often gives more time to learn transitions and modifications. The teacher’s skill, class level and willingness to adapt matter more than the label alone.
Do I need to be flexible before starting yoga?
No. Flexibility is not an entry requirement. Use supports and smaller ranges while learning control and breathing.
Can beginners practise yoga every day?
A short gentle practice may be suitable every day for some people. Alternate more demanding work with easier mobility or relaxation, and reduce the frequency if pain, unusual fatigue or declining performance develops.
What is the difference between yoga poses and asanas?
Asana is the Sanskrit term commonly used for yoga postures. Yoga as a complete system also includes ethical disciplines, breath practices, concentration and meditation.
Does yoga help with anxiety or sleep?
Some research suggests possible benefits for stress, mental well-being and sleep, but findings vary and yoga is not a substitute for mental-health or sleep-disorder treatment.[2] Gentle movement, comfortable breathing and relaxation may be supportive as part of a broader care plan.